Difference between revisions of "GitLab:Use"
| Line 1: | Line 1: | ||
=Introduction= | =Introduction= | ||
| − | [[GitLab|'''GitLab''']] is a web interface that make the sharing of programing code easier through [[git|'''git''']], a versioning control system.<br> | + | [[GitLab|'''GitLab''']] is a web interface that make the sharing of programing code easier through [[git|'''git''']], a versioning control system.<br /> |
| − | It works mostly like GitHub, which is its' "hosted by private company" equivalent (hence no one really have complete control over their code location and who can or cannot access it). | + | It works mostly like GitHub, which is its' "hosted by private company" equivalent (hence no one really have complete control over their code location and who can or cannot access it). |
We, at GIGA, provide our members with a self hosted, secure and rock solid instance of this tool. | We, at GIGA, provide our members with a self hosted, secure and rock solid instance of this tool. | ||
| Line 9: | Line 9: | ||
Once done, visit http://app.giga.ulg.ac.be/git/ and use your ULiège credentials to log in, which will send you to that screen. | Once done, visit http://app.giga.ulg.ac.be/git/ and use your ULiège credentials to log in, which will send you to that screen. | ||
[[File:gitlab_00.png|thumb|center|1024px]] | [[File:gitlab_00.png|thumb|center|1024px]] | ||
| + | |||
| Line 16: | Line 17: | ||
[[File:gitlab_02.png|thumb|center|1024px]] | [[File:gitlab_02.png|thumb|center|1024px]] | ||
| − | There are not much to go with as a new member.<br> | + | There are not much to go with as a new member.<br /> |
Most of the projects being set as "privates", you must request from your PI or any designated IT manager access to your group's repositories. | Most of the projects being set as "privates", you must request from your PI or any designated IT manager access to your group's repositories. | ||
| Line 22: | Line 23: | ||
[[File:gitlab_03.png|thumb|center|1024px]] | [[File:gitlab_03.png|thumb|center|1024px]] | ||
| − | The address is always created the same way.<br> | + | The address is always created the same way.<br /> |
From http://app.giga.ulg.ac.be/git/ is added, first, the user's (or group's) name and then repository's name. | From http://app.giga.ulg.ac.be/git/ is added, first, the user's (or group's) name and then repository's name. | ||
| Line 28: | Line 29: | ||
Those being : | Those being : | ||
| − | * '''''Private''''' | + | |
| + | * '''''Private''''' - Project access must be granted explicitly to each user. | ||
* '''''Internal''''' - The project can be accessed by any logged in user. | * '''''Internal''''' - The project can be accessed by any logged in user. | ||
| − | * '''''Public''''' | + | * '''''Public''''' - The project can be accessed without any authentication. |
| − | For security reasons -again- we ask the users to set most of their work to private, and create (or change their configuration) public ones only when needed.<br> | + | For security reasons -again- we ask the users to set most of their work to private, and create (or change their configuration) public ones only when needed.<br /> |
For, as an example, when they need to share their code at the end of their PhD or post-doc. | For, as an example, when they need to share their code at the end of their PhD or post-doc. | ||
| + | |||
==Explore a repository== | ==Explore a repository== | ||
| − | From there, things can be as much simple as they can become more complex.<br> | + | From there, things can be as much simple as they can become more complex.<br /> |
As a matter of fact, you can see on the next picture that several informations appear right after creating a repository. | As a matter of fact, you can see on the next picture that several informations appear right after creating a repository. | ||
[[File:gitlab_04.png|thumb|center|1024px]] | [[File:gitlab_04.png|thumb|center|1024px]] | ||
| Line 48: | Line 51: | ||
[[File:gitlab_05.png|thumb|center|1024px]] | [[File:gitlab_05.png|thumb|center|1024px]] | ||
| − | Right after the click come a quite lightweight interface.<br> | + | Right after the click come a quite lightweight interface.<br /> |
No tools, just some writing zones to create/modify the file's name and its' content but also a '''commit''' which is a bit like a comment related to what you did to one/several files. | No tools, just some writing zones to create/modify the file's name and its' content but also a '''commit''' which is a bit like a comment related to what you did to one/several files. | ||
| − | Usualy it is of good practice to create a README.md file.<br> | + | Usualy it is of good practice to create a README.md file.<br /> |
| − | That file is showed by default when someone come to the repository's main page and it uses a gitlab flavored markdown.<br> | + | That file is showed by default when someone come to the repository's main page and it uses a gitlab flavored markdown.<br /> |
''See more about it here : https://about.gitlab.com/handbook/product/technical-writing/markdown-guide/'' | ''See more about it here : https://about.gitlab.com/handbook/product/technical-writing/markdown-guide/'' | ||
| − | An interesting feature, like showed on the next picture, is the ability to select and interact with several places of the file at the same time by maintaining CTRL key while clicking to the wanted places.<br> | + | An interesting feature, like showed on the next picture, is the ability to select and interact with several places of the file at the same time by maintaining CTRL key while clicking to the wanted places.<br /> |
From there all the keyboard interactions (being writing, deleting, moving with the arrows, etc.) will be applied at each of your selections. | From there all the keyboard interactions (being writing, deleting, moving with the arrows, etc.) will be applied at each of your selections. | ||
[[File:gitlab_06.png|thumb|center|1024px]] | [[File:gitlab_06.png|thumb|center|1024px]] | ||
| − | Finaly, our first commit is in place.<br> | + | Finaly, our first commit is in place.<br /> |
The README.md content is, as said before, showed and its' markdown interpreted. | The README.md content is, as said before, showed and its' markdown interpreted. | ||
[[File:gitlab_07.png|thumb|center|1024px]] | [[File:gitlab_07.png|thumb|center|1024px]] | ||
| + | |||
| Line 69: | Line 73: | ||
[[File:gitlab_08.png|thumb|center|1024px]] | [[File:gitlab_08.png|thumb|center|1024px]] | ||
| − | That spot might be one of the most important ones.<br> | + | That spot might be one of the most important ones.<br /> |
Like told before, GIGA has choosen to put emphazis on security. | Like told before, GIGA has choosen to put emphazis on security. | ||
| − | Because of that, when working on your repositories you will have to be aware of it.<br> | + | Because of that, when working on your repositories you will have to be aware of it.<br /> |
| − | In fact, when inside GIGA (or through the VPN), you'll just fetch from the SSH address which is the safest way but also the stronger and powerful one.<br> | + | In fact, when inside GIGA (or through the VPN), you'll just fetch from the SSH address which is the safest way but also the stronger and powerful one.<br /> |
Thank to this, you'll just need one login-like and that's it : feel free to push, pull, remove datas without any more prompts. | Thank to this, you'll just need one login-like and that's it : feel free to push, pull, remove datas without any more prompts. | ||
| − | Though once out of our computing infrastructure, if you need some more work without any credentials others that the website's login, you'll need to select the HTTP one.<br> | + | Though once out of our computing infrastructure, if you need some more work without any credentials others that the website's login, you'll need to select the HTTP one.<br /> |
The only thing that it implies is that, at each command you'll execute (mostly pushes and pulls), it will ask you your website's username and passwords. | The only thing that it implies is that, at each command you'll execute (mostly pushes and pulls), it will ask you your website's username and passwords. | ||
| + | |||
| Line 88: | Line 93: | ||
File:setup_1_03.png|Graphs | File:setup_1_03.png|Graphs | ||
</gallery> | </gallery> | ||
| + | |||
| Line 95: | Line 101: | ||
===Snippets=== | ===Snippets=== | ||
===Settings=== | ===Settings=== | ||
| − | |||
=Terminal interface= | =Terminal interface= | ||
[[File:gitlab_09.png|thumb|center|1024px]] | [[File:gitlab_09.png|thumb|center|1024px]] | ||
| Line 147: | Line 152: | ||
=Advanced use= | =Advanced use= | ||
==Handling big files== | ==Handling big files== | ||
| − | One of the newest functionnalities is LFS (as in '''Large File Storage''').<br> | + | One of the newest functionnalities is LFS (as in '''Large File Storage''').<br /> |
Recently Git was used exclusively for sharing code (hence, small files). But nowaday even code is sometimes used with big filesets, or are provided archives, CD/DVD images, etc. | Recently Git was used exclusively for sharing code (hence, small files). But nowaday even code is sometimes used with big filesets, or are provided archives, CD/DVD images, etc. | ||
Because of that have been implemented the ability to do so, by defining (on a project-by-project basis) the file extentions to see as "big files". | Because of that have been implemented the ability to do so, by defining (on a project-by-project basis) the file extentions to see as "big files". | ||
| + | |||
| Line 167: | Line 173: | ||
'''Windows''' | '''Windows''' | ||
| − | Use the Windows installer here: <br> | + | Use the Windows installer here: <br /> |
https://github.com/git-lfs/git-lfs/releases | https://github.com/git-lfs/git-lfs/releases | ||
| + | |||
===Use=== | ===Use=== | ||
| − | Lets take a look at the workflow when you need to check large files into your Git repository with Git LFS. For example, if you want to upload a very large file and check it into your Git repository:<br> | + | Lets take a look at the workflow when you need to check large files into your Git repository with Git LFS. For example, if you want to upload a very large file and check it into your Git repository:<br /> |
<console> | <console> | ||
##i##git clone git@app.giga.ulg.ac.be:dummy/my-awesome-project.git | ##i##git clone git@app.giga.ulg.ac.be:dummy/my-awesome-project.git | ||
| Line 180: | Line 187: | ||
</console> | </console> | ||
| − | Once a certain file extension is marked for tracking as a LFS object you can use Git as usual without having to redo the command to track a file with the same extension:<br> | + | Once a certain file extension is marked for tracking as a LFS object you can use Git as usual without having to redo the command to track a file with the same extension:<br /> |
<console> | <console> | ||
##i##cp ~/tmp/mybigdataset.tgz .##!i## # copy a large file into the current directory | ##i##cp ~/tmp/mybigdataset.tgz .##!i## # copy a large file into the current directory | ||
| Line 188: | Line 195: | ||
</console> | </console> | ||
| − | And, of course, when wanting to fetch the latest big files from a repository:<br> | + | And, of course, when wanting to fetch the latest big files from a repository:<br /> |
<console> | <console> | ||
##i##git lfs fetch master | ##i##git lfs fetch master | ||
</console> | </console> | ||
| − | More informations :<br> | + | More informations :<br /> |
https://app.giga.ulg.ac.be/git/help/workflow/lfs/manage_large_binaries_with_git_lfs.md | https://app.giga.ulg.ac.be/git/help/workflow/lfs/manage_large_binaries_with_git_lfs.md | ||
Revision as of 11:06, 3 July 2018
Introduction
GitLab is a web interface that make the sharing of programing code easier through git, a versioning control system.
It works mostly like GitHub, which is its' "hosted by private company" equivalent (hence no one really have complete control over their code location and who can or cannot access it).
We, at GIGA, provide our members with a self hosted, secure and rock solid instance of this tool.
Because it is secure, we chose to activate users "on demand" and so, as a first step of this tutorial, those who wish to access it must send a mail to UDIMED-GIGA providing their ULiège username with the demand to be added to GitLab accesses.
Once done, visit http://app.giga.ulg.ac.be/git/ and use your ULiège credentials to log in, which will send you to that screen.

Web interface
Create a repository
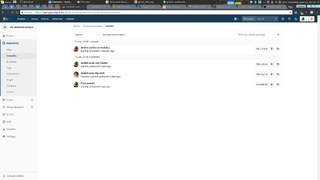
As you can see here :

There are not much to go with as a new member.
Most of the projects being set as "privates", you must request from your PI or any designated IT manager access to your group's repositories.
But, before that, let's take a look at some basics starting with the creation of your own repository.

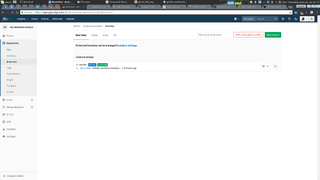
The address is always created the same way.
From http://app.giga.ulg.ac.be/git/ is added, first, the user's (or group's) name and then repository's name.
Under that "repository name" are also the description, which is most of the time skipped, and last but not least : the visibility levels.
Those being :
- Private - Project access must be granted explicitly to each user.
- Internal - The project can be accessed by any logged in user.
- Public - The project can be accessed without any authentication.
For security reasons -again- we ask the users to set most of their work to private, and create (or change their configuration) public ones only when needed.
For, as an example, when they need to share their code at the end of their PhD or post-doc.
Explore a repository
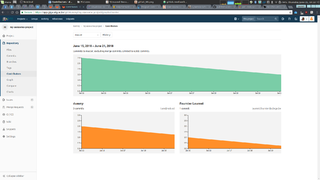
From there, things can be as much simple as they can become more complex.
As a matter of fact, you can see on the next picture that several informations appear right after creating a repository.

When a new repo is created, are always written the basic terminal commands (for which we will talk later in this tutorial) as well as links for more complete list of commands and all kind of helps.
Added to that are some of the most important informations/links such as the repository's address, needed to clone your repositories in order to work on them, but also the sidebar menu that will allow you to configure it but also to give access to users and/or groups and set their permission levels.
So first, let's create a new (first) file in this repository with the New file button.

Right after the click come a quite lightweight interface.
No tools, just some writing zones to create/modify the file's name and its' content but also a commit which is a bit like a comment related to what you did to one/several files.
Usualy it is of good practice to create a README.md file.
That file is showed by default when someone come to the repository's main page and it uses a gitlab flavored markdown.
See more about it here : https://about.gitlab.com/handbook/product/technical-writing/markdown-guide/
An interesting feature, like showed on the next picture, is the ability to select and interact with several places of the file at the same time by maintaining CTRL key while clicking to the wanted places.
From there all the keyboard interactions (being writing, deleting, moving with the arrows, etc.) will be applied at each of your selections.

Finaly, our first commit is in place.
The README.md content is, as said before, showed and its' markdown interpreted.

Address of a repository

That spot might be one of the most important ones.
Like told before, GIGA has choosen to put emphazis on security.
Because of that, when working on your repositories you will have to be aware of it.
In fact, when inside GIGA (or through the VPN), you'll just fetch from the SSH address which is the safest way but also the stronger and powerful one.
Thank to this, you'll just need one login-like and that's it : feel free to push, pull, remove datas without any more prompts.
Though once out of our computing infrastructure, if you need some more work without any credentials others that the website's login, you'll need to select the HTTP one.
The only thing that it implies is that, at each command you'll execute (mostly pushes and pulls), it will ask you your website's username and passwords.
Sidebar (setup) of a repository
Repository
Commits
Branches
Contributors
Graphs


Issues
Merge requests
Wiki
Snippets
Settings
Terminal interface


Advanced use
Handling big files
One of the newest functionnalities is LFS (as in Large File Storage).
Recently Git was used exclusively for sharing code (hence, small files). But nowaday even code is sometimes used with big filesets, or are provided archives, CD/DVD images, etc.
Because of that have been implemented the ability to do so, by defining (on a project-by-project basis) the file extentions to see as "big files".
Installation
MacOS (Using Homebrew)
brew update
brew install git-lfs
Ubuntu
curl -s https://packagecloud.io/install/repositories/github/git-lfs/script.deb.sh | sudo bash
sudo apt install git-lfs
Windows
Use the Windows installer here:
https://github.com/git-lfs/git-lfs/releases
Use
Lets take a look at the workflow when you need to check large files into your Git repository with Git LFS. For example, if you want to upload a very large file and check it into your Git repository:
git clone git@app.giga.ulg.ac.be:dummy/my-awesome-project.git
cd my-awesome-project
git lfs install                       # initialize the Git LFS project
git lfs track "*.tgz"                 # select the file extensions that you want to treat as large files
Once a certain file extension is marked for tracking as a LFS object you can use Git as usual without having to redo the command to track a file with the same extension:
cp ~/tmp/mybigdataset.tgz .           # copy a large file into the current directory
git add .                             # add the large file to the project
git commit -am "Added a large file"   # commit the file meta data
git push origin master                # sync the git repo and large file to the GitLab server
And, of course, when wanting to fetch the latest big files from a repository:
git lfs fetch master
More informations :
https://app.giga.ulg.ac.be/git/help/workflow/lfs/manage_large_binaries_with_git_lfs.md